Connecting a button
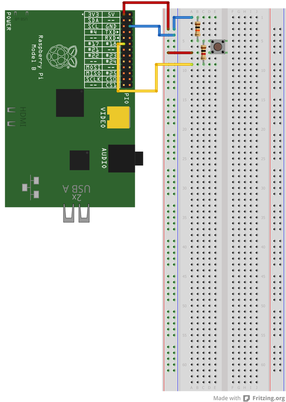
With button connected to your RPi you can easily write a program in Python to do whatever action you want. All you will need is:
- a piece of cable
- microswitch
- 10kOhm and 1kOhm resistor
For those like me, who doesn`t have breadboard, here is the same connection as above. Again, if you are not familiar with resistor coloring rules, upper one is 10kOhm, lower is 1kOhm.
Now enable GPIO port 17:
echo 17 > /sys/class/gpio/export
If you try to read value on GPIO 17, you should get value "1". While you are pressing a button, value should be "0".
cat /sys/class/gpio/gpio17/value
Next step is to use some programming skills to read state change of the button. The main problem is that GPIO itself can not directly tell you something is happening with the button. So only possible way is to do something called polling: asking GPIO on value on GPIO17 every few milliseconds. But short presses can be skipped what is unacceptable. At the beggining I found some C and C++ programs using polling. I have some knowledge of C and C++ from school. But later I found Python source code with imported module that can directly detect falling edge of voltage on GPIO pin (button press). Here is source code in Python which will execute a command "echo Button press detected!" on button press.
#!/usr/bin/env python2.7
import subprocess
import RPi.GPIO as GPIO
GPIO.setmode(GPIO.BCM)
GPIO.setup(17, GPIO.IN, pull_up_down=GPIO.PUD_UP)
GPIO.wait_for_edge(17, GPIO.FALLING)
subprocess.call(["echo Button press detected!"])
except KeyboardInterrupt:
GPIO.cleanup()
GPIO.cleanup()
After pressing button, program print echo and close. Next step is to implement cycle to write echo after every button press...
#!/usr/bin/env python2.7
import subprocess
import RPi.GPIO as GPIO
GPIO.setmode(GPIO.BCM)
GPIO.setup(17, GPIO.IN, pull_up_down=GPIO.PUD_UP)
while True:
try:
GPIO.wait_for_edge(17, GPIO.FALLING)
subprocess.call(["echo Button press detected!"])
except KeyboardInterrupt:
GPIO.cleanup()
GPIO.cleanup()
Now every button press will write echo on screen. Only possible way to stop this program is by pressing CTRL+C (KeyboardInterrupt). And you can also notice that one button press is sometimes evaluated as multiple. It`s because event called bouncing - multiple falling edges of voltage on single press. Only possible way how to avoid this behavior is to set delay after button press.
#!/usr/bin/env python2.7
import subprocess
import time
import RPi.GPIO as GPIO
GPIO.setmode(GPIO.BCM)
GPIO.setup(17, GPIO.IN, pull_up_down=GPIO.PUD_UP)
while True:
try:
GPIO.wait_for_edge(17, GPIO.FALLING)
subprocess.call(["echo Button press detected!"])
time.sleep(0.5)
except KeyboardInterrupt:
GPIO.cleanup()
GPIO.cleanup()
This problem can always be solved this way but you only have to put delay to right place. You also can replace the echo command with whatever you want...
Connecting a LED
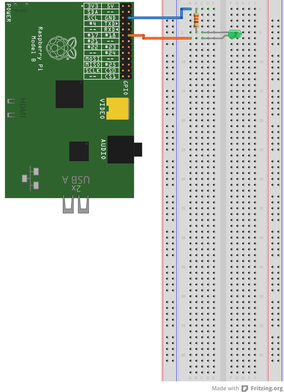
A LED connected to RPi`s GPIO can sipmply indicate whatever you want or need. All you need is:
- a piece of cable
- light emitting diode (LED)
- 330 Ohm resistor
And again, who doesn`t have breadboard...
Now with properly connected LED and GPIO port properties you can try to change GPIO port value to "1" and LED should light up. To automate changing GPIO port values you can use Python programming language. Here is a simple piece of code which change state of GPIO port to value "1".
text_file = open("/sys/class/gpio/gpio18/value", "w")
text_file.write("1")
text_file.close()
Next is program which at the beggining will read the state of GPIO (from "value" file) and inverse that state.
#!/usr/bin/env python2.7
import time
import RPi.GPIO as GPIO
GPIO.setmode(GPIO.BCM)
gpio_value_file = open("/sys/class/gpio/gpio18/value", "r")
value = gpio_value_file.read();
gpio_value_file.close()
bool_value = int(value)
if bool_value == 0:
text_file = open("/sys/class/gpio/gpio18/value", "w")
text_file.write("1")
text_file.close()
else:
text_file = open("/sys/class/gpio/gpio18/value", "w")
text_file.write("0")
text_file.close()
GPIO.cleanup()
Look at the command in bold. It is very interesting. In previous functions you read value to variable "value" from "/sys/class/gpio/gpio18/value" file. The problem is that this value is read as string, not number, so no logical (bool) operations can be used. Function in bold will ensure transition of string to integer (number). Till now you can work with variable in calculations.
Using button to control LED
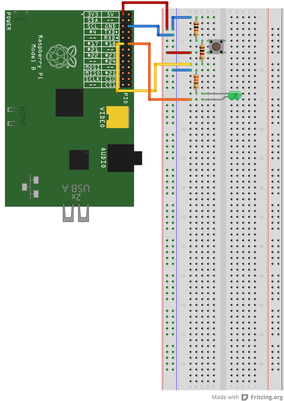
And now the interesting part. We can use button to control LED. Here is a schme I currently use.
Or without breadboard...
This is a simple Python program to use button to control LED. Every button press will change the state of LED. But here you can see drawback of using half second delay to suppress bouncing effect. Quick pressing of button (under 0,5 second) can be ignored due to delay.
#!/usr/bin/env python2.7
import time
import RPi.GPIO as GPIO
GPIO.setmode(GPIO.BCM)
GPIO.setup(17, GPIO.IN, pull_up_down=GPIO.PUD_UP)
while True:
try:
GPIO.wait_for_edge(17, GPIO.FALLING)
gpio_value_file = open("/sys/class/gpio/gpio18/value", "r")
value = gpio_value_file.read();
gpio_value_file.close()
bool_value = int(value)
if bool_value == 0:
text_file = open("/sys/class/gpio/gpio18/value", "w")
text_file.write("1")
text_file.close()
time.sleep(0.5)
else:
text_file = open("/sys/class/gpio/gpio18/value", "w")
text_file.write("0")
text_file.close()
time.sleep(0.5)
except KeyboardInterrupt:
GPIO.cleanup()
GPIO.cleanup()
All source codes on this site are released under Beerware licence... In short, you can do anything with the source code, but if you consider it or any part of it useful, you are encouraged to buy me, as author, a beer "in return" :)


