Installation and setup of OpenSSH (Secure shell) server
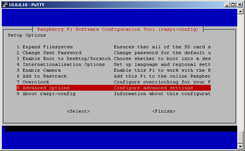
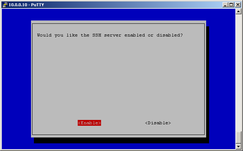
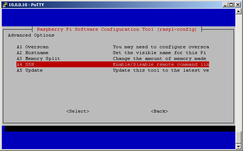
OpenSSH server is installed by default in Raspbian, so nothing to do here... :) In older Raspbian images OpenSSH was not automatically started at startup, only way to enable it was by connecting RPi to monitor or TV + keyboard, start RPi, login to console and run raspi-config:
raspi-config
You will be returned to screen 1, tap TAB twice and "Enter" (Finnish). At next bootup, OpenSSH service will run automatically. In newer Raspbian images this step is not needed.
Enable root login in OpenSSH
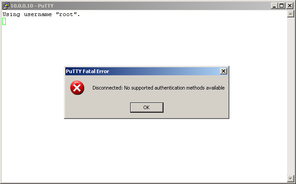
I usually want to use root account to login to RPi. In default configuration of OpenSSH are root logins restricted due to security reasons because every linux has a user named "root" with unlimited privileges which is very advantageous for script kiddies trying to guess your password over Internet (of course root account can be renamed and you can also change its UID - but I don`t know of anybody who use this, even it is a good security enhancement). But if you eliminate that password guessers (anyhow), you can permit logins under root account. Edit OpenSSH configuration file...
nano /etc/ssh/sshd_config
...and change "PermitRootLogin" statement (around line 30):
PermitRootLogin yes
Save and close configuration file, and restart OpenSSH service (don`t be affraid, existing connections will not be terminated)
root@server:~# /etc/init.d/ssh restart
[ ok ] Restarting OpenBSD Secure Shell server: sshd.
Avoid enabling root account or even opening OpenSSH service to the Internet without some kind of service security enhancement. Once I tested to enable access to OpenSSH service in default configuration (kind of honeypot) - result? - 75 000 connection attemps in 12 hours. OpenSSH in default configuration allows 3 login attemps per connection. It means 225 000 (!) username/password pairs tested. Most active countries - China and Russia...
Security enhancements
There are a lot of ways to secure OpenSSH. The more you implement, the better.
Change root`s username
As I stated above, it is a good idea to rename root account. "root" is the first username that scripts use when trying to compromise you. This can be done by editing first line of /etc/passwd file
nano /etc/passwd
And change "root" in the first line to whatever username you want:
root:x:0:0:root:/root:/bin/bash
...to, for example...
pseudoroot:x:0:0:root:/root:/bin/bash
Close file and save changes. To changes take effect, logout and login again (of course with new username).
Change default port 22
OpenSSH listens for new connections at TCP port 22. To change default port number edit OpenSSH configuration file:
nano /etc/ssh/sshd_config
At the very beggining of the file (around line 5) is statement "Port 22". Change it to desired number:
Port 56789
Close file, save changes. It is required to restart service:
root@server:~# /etc/init.d/ssh restart
[ ok ] Restarting OpenBSD Secure Shell server: sshd.
To check if OpenSSH listens at new port, issue:
root@server:~# netstat -tnl | grep 56789
tcp 0 0 0.0.0.0:56789 0.0.0.0:* LISTEN
Permit access to port 22 only from your local network
For this we can use a 2 simple firewall rules in iptables. At first install iptables package:
apt-get install iptables
Now add two rules... First rule allows connection to port 22 from your local network (change address in bold black according to your subnet). Second rule drops every packet trying to initiate a communication on port 22 if it doesn`t originate in your LAN.
iptables -A INPUT -i eth0 -p tcp -s 192.168.1.0/24 --dport 22 -j ACCEPT
iptables -A INPUT -i eth0 -p tcp --dport 22 --tcp-flags SYN,RST,ACK SYN -j DROP
iptables rules will be flushed at reboot. To save iptables and load them again startup, issue this commands:
iptables-save > /etc/firewall.conf
echo "iptables-restore < /etc/firewall.conf" >> /etc/network/if-up.d/iptables
chmod +x /etc/network/if-up.d/iptables
These are quite strict rules which don`t allow you to connect from Internet. Surely you heard of geoIP service telling you from which country you are connecting to Internet (for example here). This database of IP address ranges with appropriate countries can be found here (drop down menu on the right side under "Country IP listing"). Simply replace your LAN`s IP subnet with subnets from database. One ACCEPT rule per subnet basis. DROP rule must always be last. By this you will allow to connect to server only from desired country/countries. If something goes wrong (you can not connect, mistyped in subnet...), you can remove all iptables rules by issuing:
iptables -F
To list currently installed rules, issue:
iptables -L -n -v
Disable password authentication, use certificates instead
When you connect to OpenSSH server, you are immediately asked for password. If you disable password authentication, and certificate is not provided by connecting client, connection is dropped. This is a good protection against brute-force attacks.
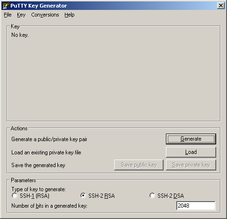
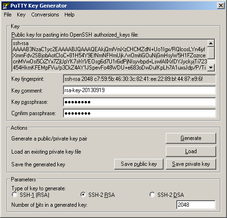
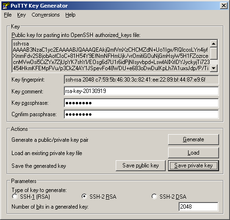
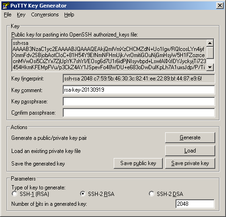
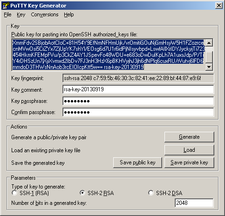
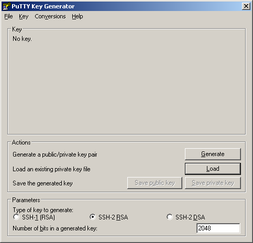
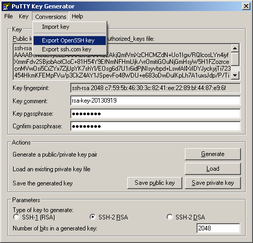
Before you disable password authentication, generate a key pair to let OpenSSH server authenticate you. Key pair can be generated in Windows using puttygen.exe tool (downloadable here). Start puttygen.exe and click "Generate". Now you have to move around the raising bar (your movement trace is used as source of randomness). When bar is full, wait a few seconds to generate a key pair. You can use password to secure key so it can not be clearly readable (and simply copied). Then click "Save private key". Save key, for example, as a "ssh.ppk". Now copy a public key part from puttygen window...
...paste this public key string to your users home directory into .ssh/authorized_keys. This can be done by executing:
echo "copied_public_key" >> ~/.ssh/authorized_keys
Public key is single long line, so it may look like this:
echo "ssh-rsa AAAAB3NzaC1yc2EAAAABJQAAAQEAkjQmfVmXzCHCMZdN+Uo1Igx/RQlcosLYn4iyfXmmFdv2SBjobAotCIoC+81H54Y9EfNmNFHmUjk/vrOmitiGOuNjGmHsyW5H1FZozrcecnMVwOsi5CrZYx7ZjUpYK7shYl/EOsg6d7U1r6idPjNIsyvbpd+LswfAIlXrIDYJyckyjTi723454HkmKFEMpFVu/p3CkZ4AY1JSpevFo48WDU+e683oDwDuIKpLh7A1uxsJdp/P/TiY4rDHSzUn7jXyXvmxd2IbDv7FJ3nH3HzX6pBKHVyjhJ3jh6dNPlq6cuxRU/rVutvj6lFD6mmdoD3THWsNnAob3rcEIOIcpKtt5w== rsa-key-20130919" >> ~/.ssh/authorized_keys
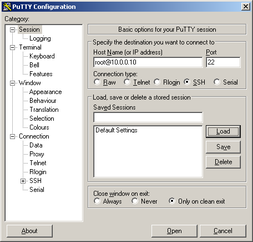
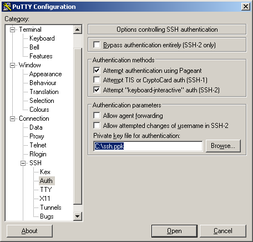
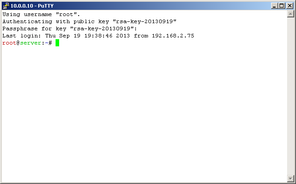
Try if you can authorize with private key. Start new session in Putty. Write IP address of RPi, correct port. One the left side, expand "SSH", then "Auth". Now "Browse" for ssh.ppk file (private key). Click Open, you should be asked for passphrase to private key. If you provide right passphrase, you should be logged in.
If it is not working, check configuration file has set these parameters:
RSAAuthentication yes
PubkeyAuthentication yes
AuthorizedKeysFile %h/.ssh/authorized_keys
If not, change them according to above. Do not forget to restart ssh service:
root@server:~# /etc/init.d/ssh restart
[ ok ] Restarting OpenBSD Secure Shell server: sshd.
Now if authentication with private key is working, you can disable password authentication in OpenSSH. Edit configuration file:
nano /etc/ssh/sshd_config
Find parameter "PasswordAuthentication yes" (cca line 52) and change to:
PasswordAuthentication no
Now close and save... Again, do not forget to restart OpenSSH service:
root@server:~# /etc/init.d/ssh restart
[ ok ] Restarting OpenBSD Secure Shell server: sshd.
Now you should be able to authenticate with private key in Putty. If you want to connect to your RPi from another linux machine with built-in OpenSSH client, you will need to export private key from puttygen in OpenSSH format. To do so, open putygen.exe again, load private key file (ssh.ppk) and click "Conversions > Export OpenSSH key". Save as, for example ssh.key.
To connect from OpenSSH client, issue:
ssh -i /path/to/ssh.key -p 22 -l root 192.168.1.1
One-time passwords with Google Authenticator
One-time codes are good security enhancement, extending authentication mechanism from "something you know" (password) to also "something you have" (smartphone) - hence two-way authentication. Google Authenticator is application (Android or iOS) that generates codes based on two parameters. Some randomly generated string which is only on your server and inside Google Authenticator application and actual time. To enable two-way authentication, at first install libpam-google-authenticator package:
apt-get install libpam-google-authenticator
Now generate that "random string". Be careful, every user has its own. So this command have to be ran under desired user:
google-authenticator
It will ask a few questions. First if you want authentication tokens to be time-based. Type "y" and Enter. Now you can see google-authenticator generated a QR code. And ask another question if you want to update your "~/.google_authenticator" file. Again, answer "yes". And another question (about disallowing multiple uses of the same one-time code), again answer "yes". On next qestion answer "no". And finally last question about rate limiting of pam module - answer "yes".
Do you want authentication tokens to be time-based (y/n) y
https://www.google.com/chart?chs=200x200&chld=M|0&cht=qr&chl=otpauth://totp/root[at]tomasgreno.cz%3Fsecret%3DXVN7YJAL3JFS67E4
__________________________________________________
| |
| |
| |
| |
| |
| |
| |
| |
| |
| QR code |
| |
| |
| |
| |
| |
| |
| |
| |
|__________________________________________________|
Your new secret key is: XVN7YJAL3JFS67E4
Your verification code is 836118
Your emergency scratch codes are:
73255768
20362134
22016896
59438973
36500379
Do you want me to update your "/root/.google_authenticator" file (y/n) y
Do you want to disallow multiple uses of the same authentication
token? This restricts you to one login about every 30s, but it increases
your chances to notice or even prevent man-in-the-middle attacks (y/n) y
By default, tokens are good for 30 seconds and in order to compensate for
possible time-skew between the client and the server, we allow an extra
token before and after the current time. If you experience problems with poor
time synchronization, you can increase the window from its default
size of 1:30min to about 4min. Do you want to do so (y/n) n
If the computer that you are logging into isn't hardened against brute-force
login attempts, you can enable rate-limiting for the authentication module.
By default, this limits attackers to no more than 3 login attempts every 30s.
Do you want to enable rate-limiting (y/n) y
Very important thing! Backup your emergency scratch codes. In case you lost your smartphone or empty battery or... can these codes be used to login. Every code only once so don`t waste them (although new set of emergency codes can be generated).
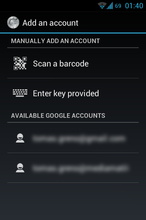
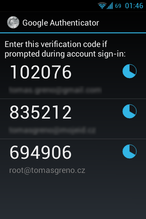
Now there are 3 ways how to get generated string into Google Authenticator application in your smartphone. First, click on the link right above QR code. It will redirect you to image with QR code. Second, there is a QR code that can be simply scanned with Google Authenticator application. Third, key in human readable format, that can be rewrited to Google Authenticator application.
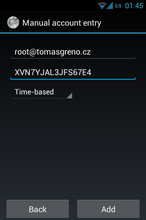
So download and start Google Authenticator on your smartphone, press "Menu" and "Set up account". Select "Enter key provided". On first line write some note to know where you can use this codes (for example - root[at]tomasgreno.cz). On second line, rewrite your key and pick "Time-based" option.
To set OpenSSH to ask for one-time codes, open its configuration file:
nano /etc/ssh/sshd_config
And find challenge response authentication statement (line 48 in my case) and change to "yes".
ChallengeResponseAuthentication yes
Close and save changes. Now edit pam`s sshd module:
nano /etc/pam.d/sshd
And add this string to the last line:
auth required pam_google_authenticator.so
Close and save changes. Now you can restart OpenSSH service.
/etc/init.d/sshd restart
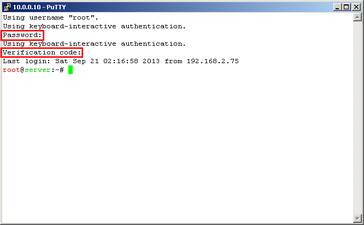
Try to open another connection (do not close current, if any problem appear, you can revert changes) and you should be asked for password and one-time code too...
Send mail notification at successful login
Another useful tweak is to set OpenSSH to notify you when somebody logs in. At first you have to install package sSMTP:
apt-get install ssmtp
Next step is to create a gmail account which will your RPi use to send mails to your email (optional, you can also use one address - so you will send mails to yourself). For example the new account will be named "rpiserver[at]gmail.com" with password "1234". Now open the ssmtp config file:
nano /etc/ssmtp/ssmtp.conf
And paste something like this:
# Config file for sSMTP sendmail
root=rpiserver@gmail.com
mailhub=smtp.gmail.com:465
rewriteDomain=gmail.com
FromLineOverride=YES
AuthUser=rpiserver
AuthPass=1234
UseTLS=YES
Change the login and password (in bold) to match yours. Now close file (CTRL+X...) and save changes (...press "y" and Enter). From this moment you should be able to send mail by command:
echo "body" | mail -s "subject" personal.account@gmail.com
Change account@gmail.com to your personal mail. Of course you also can change body or subject of mail. Mail will be sent from account defined in ssmtp.conf (rpiserver[at]gmail.com). If you get "-bash: mail: command not found", install mailutils package first.
apt-get install mailutils
Now you have to set ssh to send mail at successful login. SSH has a feature which execute a file named "sshrc" in /etc/ssh/ at this situation. By default, this file doesn`t exist so you have to create it and make it executable.
touch /etc/ssh/sshrc
chmod +x /etc/ssh/sshrc
Now open this file:
nano /etc/ssh/sshrc
And paste this example configuration:
#!/bin/bash
time=`date +"%d.%m.%Y %T"`
user=`whoami`
hostname=`hostname`
body="Succesful login of user \""$user"\" at "$time""
head="Succesful SSH login at "$time" to "$hostname""
echo "$body" | mail -s "$head" personal.account@gmail.com &
exit 0
Than close file (CTRL+X...) and save changes (...press "y" and Enter). From now at every successful login to SSH, this script will send you a mail containing something like "Succesful SSH login at 21.09.2013 17:20:21 to server" in subject and "Succesful login of user "root" at 21.09.2013 17:20:21" in body of message. Of course you can personalize your subject and body. Thanks to DKIM (DomainKeys Identified Mail) at gmail smpt, mail delivery is matter of seconds :)
Security enhancements I will document later
- call server (via GSM) to let RPi know I want to connect
Security enhancements I will NOT document
- Fail2ban (python script to analyze logs for malicious activity)
- DenyHosts (python script to analyze logs for malicious activity)
This scripts look into and analyze OpenSSH log file. General technique is to drop connection attemps from IP addresses trying to connect in high frequencies. In nowaday scope of Internet (NAT, even carrier-grade NAT...) these scripts are not very useful. One "script-kiddie" can cut the whole network from ability to connect to your server.
