Thermal sensor connected via I2C
There are 2 ways of connecting DS18B20 thermal sensor. Via emulated 1wire bus, which have some major disadvantages. First is that 1wire data link is acting as very long "antenna" which catches interferences. 1wire bus on RPi is not implemented in hardware, but only as software on GPIO4. GPIO pins on RPi are directly connected to CPU. So every interference cought on 1wire bus is transported directly to Broadcom SoC which can be easily destroyed. This kind of 1wire bus should not be longer than 10-20cm or you risk damaging RPi.
Maybe you are asking why to use I2C to 1wire reduction, since there are also thermal sensors which you can connect directly via I2C (TMP102 for example)... There are at least 3 reasons - I2C thermal sensor is much more expensive, has limited accuracy (+/-2°C) and limited maximal length of bus. On the other hand, thermal sensor for 1wire (like DS18B20) has better accuracy (+/-0.5°C) and data line can be 100m long (in case of parasite power supply and pullup transistor up to 500m!). And use of reduction means that all interference from long 1wire data line is filtered by integrated circuit, which costs less than 1€.
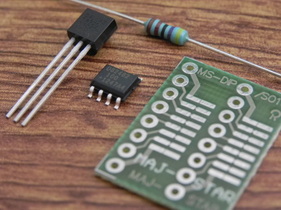
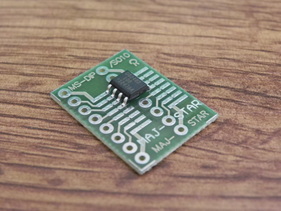
Integrated circuit which acts like I2C to 1wire converter, is called DS2482S-100. This converter is sold in SO-8 package which is almost unsolderable. So it is required to buy some reduction. Everything listed you can buy under 3€. So again, required pieces:
- DS18B20 thermal sensor
- DS2482S-100 I2C to 1wire
- MS-DIP to SO-8 reduction
- 4.7 kOhm resistor
- piece of cable
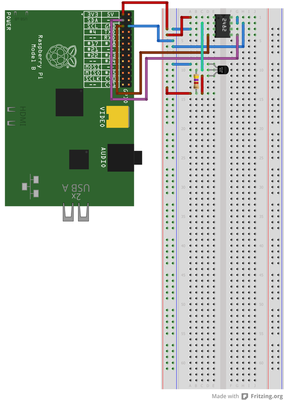
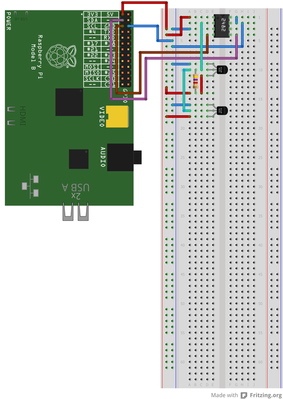
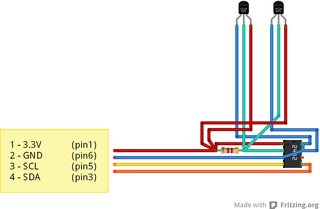
After soldering DS2482S-100 on reduction, you can use breadboard to connect temperature sensor like it is connected here:
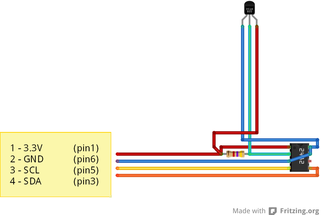
Maybe it look quite confusing, this picture is maybe more explanationary :)
When you have thermal sensor connected, we can setup Raspbian to be able to read temperature. At first remove I2C modules from kernel blacklist.
nano /etc/modprobe.d/raspi-blacklist.conf
And comment this line (add "#" at the line start)
#blacklist i2c-bcm2708
And close file (CTRL+X...) and save changes (...press "y" and Enter). Now load this modules:
modprobe i2c-bcm2708
modprobe i2c-dev
To load this modules at every startup, edit "/etc/modules" file:
nano /etc/modules
And add this two new lines:
i2c-bcm2708
i2c-dev
Close file (CTRL+X...) and save changes (...press "y" and Enter). Now install some tools to work with I2C.
apt-get install i2c-tools python-smbus
You can check that something is "alive" at i2C bus.
i2cdetect -y 1
Number 1 is something like identification of I2C port. If you have older RPi (rev.1 with 256MB RAM) use number 0. You will get info about addresses in use. It means that something is on the other end. Mine looks like this:
0 1 2 3 4 5 6 7 8 9 a b c d e f
00: -- -- -- -- -- -- -- -- -- -- -- -- --
10: -- -- -- -- -- -- -- -- 18 -- -- -- -- -- -- --
20: -- -- -- -- -- -- -- -- -- -- -- -- -- -- -- --
30: -- -- -- -- -- -- -- -- -- -- -- -- -- -- -- --
40: -- -- -- -- -- -- -- -- -- -- -- -- -- -- -- --
50: -- -- -- -- -- -- -- -- -- -- -- -- -- -- -- --
60: -- -- -- -- -- -- -- -- -- -- -- -- -- -- -- --
70: -- -- -- -- -- -- -- --
The thermal sensors is connected at address 18. Now we know that thermal sensor is communicating and we can try to ask it for temperature. For this we will need to install owfs and ow-shell package.
apt-get install owfs ow-shell
Now create a folder in /mnt for example.
mkdir /mnt/1wire
And open owfs configuration file /etc/owfs.conf and comment (add "#" at start of line) this:
#server: FAKE = DS18S20,DS2405
And add following lines to the end:
device = /dev/i2c-1
mountpoint = /mnt/1wire
Celsius
allow_other
error_print = 0
error_level = 0
Close file (CTRL+X...) and save changes (...press "y" and Enter). Next open /etc/fuse.conf file and uncomment (remove "#" at the line start) following statement:
user_allow_other
Close file (CTRL+X...) and save changes (...press "y" and Enter). Now you edited configurations of few services. It is good to restart RPi to actions take effect.
reboot
After reboot start "owfs":
owfs
OWFS stands for 1wire filesystem. Now you will get what it means :) Go to folder created earlier "/mnt/1wire" and list:
cd /mnt/1wire/
ls
And there you will see folder named something like 28.C2D5C4040000. This number is serial number unique for every DS18B20. "cd" into this directory and list.
cd 28.C2D5C4040000
ls
You should see file "temperature". As you assume, "cat" it
cat temperature
You got what you wanted all the time :)
24.9375
After reboot, you have to start owfs again, so issue...
crontab -e
And add new line with this string:
@reboot sudo -u root owfs
Close file (CTRL+X...) and save changes (...press "y" and Enter).
Connecting more thermal sensors to I2C bus
One of advantages of 1wire bus is its simple expandability. After connecting second thermal sensor, it will appear as another folder named after unique serial number. Here is a guide how to add new sensor...
Or the same without breadboard...
With this connection, thermal sensors work on 50m. I can not test further distances because I do not have such long cables. But it should work for up to 100m. How to implement parasite power supply for thermal sensors and pullup transistor is detaily described in DS18B20 datasheet here (page 6).
Solve wiring problems with a PCB
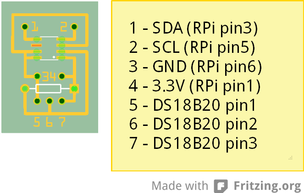
At this stage you probably have little wiring problems. It would be awesome if somebody draw a small PCB on which everything will be already interconnected, so you will only have to connect few wires. Since now nobody did it, so... here you are :)
Only connect pins 1-4 to RPi. On pins 5, 6 and 7 will be connected DS18B20 with up to 100m cable. Dimensions of this PCB are 20x30mm. Maybe one day I will order a few pieces.
Python program to read temperature
As a small bonus, here you have a simple python program to read temperature every second, with simple progress bar. Create new file...
touch temperature.py
...make it executable...
chmod +x temperature.py
...and edit it:
nano temperature.py
Paste this, only change address to file with temperature....
#!/usr/bin/env python2.7
from sys import stdout
from sys import exit
from time import sleep
while True:
try:
temp = open("/mnt/1wire/28.C2D5C4040000/temperature", "r")
t_raw = temp.read()
temp.close()
t = float(t_raw)
print(('\r%.2f\xb0C ') % t),
stdout.flush()
for x in range(10):
print('\b#'),
stdout.flush()
sleep(0.1)
print('\r'),
for x in range(15):
print(" "),
stdout.flush()
except KeyboardInterrupt:
break
exit()
Now close file (CTRL+X...) and save changes (...press "y" and Enter). Now you can run...
./temperature.py
Program can be stopped by keyboard shortcut "Ctrl+C".
